Sunday, September 29, 2013

Oreo Pudding Poke Cake, Courtesy of the Awesome Roomie


I’m living in a dorm this year, and I’m really glad I am.  I feel like I’ve made a lot of friends this way having late-night study sessions, movie marathons, and laundry parties!
  
Our laundry parties typically involve doing laundry (obviously), some studying (more or less depending on the day), and lots and lots of junk food!  For our most recent laundry party, my roomie decided she wanted to make an Oreo pudding poke cake.  I KNOW.  She had gone shopping before to buy all of the ingredients, and then came back to the dorm and announced that we were making this cake and having a laundry party.  Don’t you just love the spontaneity of college?

Here are the ingredients:


1 box chocolate cake mix 
Note: We used the Betty Crocker Butter Chocolate kind, but I’m sure any kind would do.
Eggs, water, and oil called for on the box. 
Note:  The cake mix she bought called for butter instead of oil, which is typical of cake mixes.  But we used margarine instead because that is what we had in our fridge.  We also used the egg product you find in a carton, because we didn’t want 9 eggs sitting in our fridge for the next week.
2 boxes Oreo instant pudding mix (NOT cook and serve)
4 cups milk (2 per box of pudding)
1 cup crushed Oreo cookies, optional

What you do:
Preheat the oven to 325° or 350°, depending on what the box's directions.  Grease the bottom of the pan with either cooking spray or a little butter.

Make the cake according to the directions on the box.  If you’re using butter, you’ll want to use an electric mixer to mix everything.  Luckily, there was a handheld mixer in our kitchenette.  If you use oil, you won’t need to use an electric mixer.  If you’re using butter and have no way of attaining an electric mixer, just cut the butter up really tiny and do your best mixing it all up.  College is all about being creative and experimenting, right?

 Kaitlyn the master chef pouring the batter into the prepared pan.

Bake the cake for 25-30 minutes, or until it is pulling away from the edges slightly and springs back when you touch it.  Another way to check is to stick a toothpick or knife in the center, and if it comes out clean, then you know it’s done!

When there are about 5 minutes left on the cake, make the pudding.  Mix the pudding mix and milk together and let it sit for a few minutes.  It will start to thicken slightly, but we don’t want it too thick because we’ll be pouring it over the cake.

When the cake is done baking, pull it out and poke holes in it using the rounded side of a knife or fork.  Don’t be shy!  The more holes, the more space the pudding can infiltrate the cake with its Oreo goodness. 


Pour the pudding over the warm cake, making sure to spread the love evenly making sure to cover the corners and edges.  For added deliciousness, you can sprinkle some crushed Oreos over the top.


This cake was a very welcome edition to our laundry party.  I personally think it tasted better the next day, but  you really can’t go wrong eating it at anytime of the day.  However, if you do have leftovers, make sure you store them in the fridge.


Dorm life for the win.

Wednesday, September 18, 2013

Cookie Dough Granola


I need to apologize.

First, I need to apologize for the quality of my photos.  The cord I brought with me to transfer my pictures from my camera onto my computer doesn’t actually fit into my computer, so I have to resort to using my iPod.

Second, for early morning classes.  I have a 7:30 am class 3-4 times a week, so I know the pain of them all too well.  Is it even legal for college students to be up that early?

Although I don’t have to power to convince the professor to make the class start an hour later, I can at least offer something to help those early mornings a little more bearable.


Here’s what you’ll need:

1 14 oz. package of refrigerated cookie dough.  I used chocolate chip, but peanut butter would be equally delicious
2 cups old-fashioned oatmeal
2/3 cup mix-ins (optional): peanuts, walnuts, coconut, etc.

Preheat the oven to 325°F.  Line a jellyroll or a 9x13 pan with aluminum foil (Note: I made half of this granola without lining the pan with foil and it worked equally well.  It just baked faster than the other batch).


Mix together the cookie dough, oatmeal, and mix-ins in a big bowl.  I find it easier (and much more fun) if you use your hands for this.  Make sure they are mixed well- you don’t want a whole cup of loose oatmeal sitting in the bottom of your bowl.

Crumble the mixture into your prepared pan and then bake it for 25-30 minutes, taking it out and stirring it every 10 minutes or so.   When the granola is a golden brown, you know it’s done! Notice the difference in color between the last picture and this one:


Lift the foil out of the pan and set it on the counter to let the granola cool. 

The best part about this recipe is that it tastes just like a cookie, but we can mix it with yogurt and call it breakfast.  You can also enjoy it by the handful or atop a big scoop of ice cream.


Here is to better early mornings!

Tuesday, September 17, 2013

Game Day Chili Dip


It’s that time of year again.

The time where our weekends are devoted to eating pizza and hot dogs and watching football.  For some people, there is more of the former than the latter, but as far as I’m concerned, there is no shame in going to football parties just for the food.  That way, you rarely leave disappointed!  Purdue started its football season 3 weeks ago, and so far, we’re 1-2.  We almost beat Notre Dame last weekend, but a tragic interception in the third quarter allowed them to steal the win.

Regardless of how your favorite team is doing, this dip will always be a success.  It uses very few ingredients, can be thrown together in less than 10 minutes, and can be made without leaving the comfort of your dorm room.

These are the ingredients that you’ll need:

1 8 oz. package of original cream cheese (block or whipped spread will work)
1 can of chili with beans
1 cup of shredded cheese, I like either Mexican blend or Colby Jack
Tortilla chips, for serving

Notice the overwhelming presence of off-brand items.  They taste the same as the leading brand and they’re cheaper, so it’s a win-win for everybody!

I’ve only ever made this dip with a block of cream cheese (instead of the whipped kind), but our neighbors had a tub of whipped cream cheese they were trying to get rid of, and it worked really well in the recipe. 


First spread the cream cheese onto a large MICROWAVABLE plate.  Don’t use a paper plate or one of the 5 frisbees you’ve accumulated at club fairs.


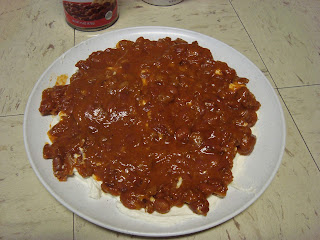
Next, spread the chili over top of the cream cheese making sure to spread it around to the edges of the plate.  


Then cover it with copious amounts of cheese.  Because, well, most things in life taste better when they are doused in cheese.


Pop it in the microwave for 3-5 minutes or until the cheese is melted and the dip is warm.

That’s it!  Enjoy with tortilla chips, potato chips, or most other kinds of chips.  If you’re thinking you’d like to eat it with Doritos and replicate something similar to a Doritos Locos Taco, then you better invite me over and share. 


All of these ingredients cost less than $5.  Like I said, most of the things I bought were the off-brand variety and my neighbors graciously donated the cream cheese.

The best part is that you’ll have extra cheese and tortilla chips, which means you can have nachos for halftime!

Saturday, September 14, 2013

A Quick Welcome and Some Facts About Me


Hi everyone!
            My name is Lindy and I am currently a freshman at Purdue University (Boiler Up!) studying hospitality and tourism management.  What inspired me to choose that career?  For one thing, I love food!  I really enjoy cooking, and a lot of what I will share with you are tips and tricks I learned from my mom and grandma.  However, being in college limits my food options to dining court food and ramen noodles.  While both can be good in moderation, every so often I get a real hankering for home cooked food and the ability to experiment in the kitchen.
            Which is what brought this blog into existence.  I wanted to find a way to cook my own food not only for the times when I got tired of eating cafeteria food, but let’s face it, it’s a good way to make a lot of friends.   However, cooking in a dorm has several challenges of its own.

1.     Limited space.  Not only is the kitchenette small, the dorm room isn’t super spacious either.  I don’t have the room to store all of the ingredients and equipment I would like to use.  For example, I don’t want to buy a whole 5 pound bag of flour to use just ¼ cup in a recipe.

2.     Limited time.  While being in college gives you more free time, it seems to fill up very quickly.  I don’t want the recipes to take too long to make, and I also don’t want there to be too many dishes to clean!

3.     Money!  As a poor college student, I don’t have the money to buy pine nuts for $20 a pound. 

4.     I wanted the recipes to be quick, easy, and semi healthy (some of the time) if for no other reason than to assure my mom that I wasn’t just eating French fries and cookies at every meal.  But the most important thing is that they must be delicious!

So keeping these things in mind, I’m on a quest to find college friendly recipes that will satisfy those late-night cravings and help you make a few friends along the way.  Here's to a future of inevitable failures, successes, late night study parties, and countless memories.  Cheers!